Make a paper toolkit with this easy step-by-step video tutorial and then pretend you’re building Arthur’s tree house alongside his family! This preschool craft was originally imagined to go with Arthur’s Tree House and Play Set but can be used anytime you’d like to make your own paper toolbox or paper toolkit.
You’ll need:
-
1 piece of colored construction paper thats 8.5 “ x 11” (in any color)
-
Crayons
-
Scissors (and your adult)
-
Glue (and your adult)
INSTRUCTIONS:
-
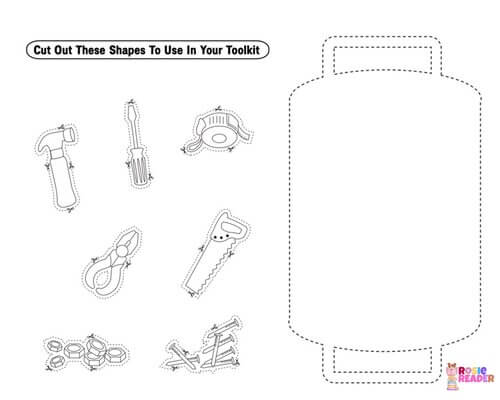
Cut out the frame for the toolkit.*
-
Trace the toolkit frame onto the construction paper, cut it out, then glue together. Use this approach if you’d like to teach your child how to use a template. *For a shortcut: Glue the paper with the frame onto the construction paper, this way you only need to cut the frame template out one time.
-
Turn the paper so the plain white side is facing you and the handles are to each side, then fold so that the handles properly align.
-
Color the tools that came on the other page of the printable template.
-
Cut out the shapes.
-
Position the shapes as you’d like on the inside of your toolkit, which is the plain white side.
-
Glue the tools in where you’d like.
Alternatively, you could use heavy card stock and swap glue for loops of painter’s tape or VELCRO (or similar product), if you’d like your child to be able to remove and insert the tools. You could also first glue the tools template onto heavier card stock as well, so they hold up longer for this type of play.
